Thursday

Cauliflower and Potato Gratin ~


We got a lot of snow in Boston last weekend.  Over two feet of the white stuff!  Drifting and piling everywhere.  As you can imagine, we have hardly any space for all of that snow.  So, we actually had mountains of snow in our lots and street corners.  It's a good thing that it's February, because it will melt fast.    So, being snowbound for the weekend, meant I got to stay home and play in the kitchen.

I decided to adapt Martha Stewart's potato gratin into one that I could serve as a vegetable side as well.  This dish works well, ptoatoes and cauliflower are a delicious match.  Just add grilled meat or fish and you have a complete meal.   I didn't have any breadcrumbs, so I elimated it.  No one noticed, because I believe the cheese is the star of this dish. 

1 head of cauliflower, cut into small florets
2 medium yukon gold potatoes, sliced thin
3 Tbsp butter
1/3 cup flour
2 cups milk
1/2 tsp salt
1/4 tsp pepper
4 oz. Gruyere cheese, shredded
3 Tbsp bread crumbs
2 Tbsp parmesan cheese, finely grated (3 Tblsp)
1/4 tsp dried oregano (didn't use)
1/2 tsp parsley flakes (didn't use)

pinch of freshly ground nutmeg

Directions:

Preheat oven to 350 degrees.
Cut up the cauliflower into small florets and set aside.


Heat a large pan over medium heat and add butter. When butter has melted whisk in the flour and then slowly add the milk.
Add the cauliflower,potatoes, nutmeg, salt and pepper.  Bring the mixture to a boil and then reduce to a simmer. Cover the pan and cook for 5 minutes.


Remove the pan from the heat and stir in the grated gruyere cheese.
Once the cheese has melted pour everything into a 2 quart baking dish.
In a small bowl combine the bread crumbs, parmesan cheese, oregano and parsley flakes. Stir the mixture and sprinkle it over the top of the cauliflower. (You may not use all the mixture just enough to coat the top)
Cover with foil and bake for 20 minutes.
Remove the foil and bake for another 15 minutes, or until it's golden and bubbly on top.  (I turned the broiler on for 5 minutes) 


Enjoy ~


Cauliflower and Potato Gratin ~


We got a lot of snow in Boston last weekend.  Over two feet of the white stuff!  Drifting and piling everywhere.  As you can imagine, we have hardly any space for all of that snow.  So, we actually had mountains of snow in our lots and street corners.  It's a good thing that it's February, because it will melt fast.    So, being snowbound for the weekend, meant I got to stay home and play in the kitchen.

I decided to adapt Martha Stewart's potato gratin into one that I could serve as a vegetable side as well.  This dish works well.  Just add grilled meat or fish and you have a complete meal.  By the way, it's a delicious combination.  I didn't have any breadcrumbs, so I elimated it.  No one noticed, because I believe the cheese is the star.  I added a little extra parmesan to the top of the gratin before it went in the oven.

1 head of cauliflower, cut into small florets
2 medium yukon gold potatoes, sliced thin
3 Tbsp butter
1/3 cup flour
2 cups milk
1/2 tsp salt
1/4 tsp pepper
4 oz. Gruyere cheese, shredded
3 Tbsp bread crumbs
2 Tbsp parmesan cheese, finely grated (3 Tblsp)
1/4 tsp dried oregano (didn't use)
1/2 tsp parsley flakes (didn't use)

pinch of freshly ground nutmeg

Directions:

Preheat oven to 350 degrees.
Cut up the cauliflower into small florets and set aside.


Heat a large pan over medium heat and add butter. When butter has melted whisk in the flour and then slowly add the milk.
Add the cauliflower,potatoes, nutmeg, salt and pepper.  Bring the mixture to a boil and then reduce to a simmer. Cover the pan and cook for 5 minutes.


Remove the pan from the heat and stir in the grated gruyere cheese.
Once the cheese has melted pour everything into a 2 quart baking dish.
In a small bowl combine the bread crumbs, parmesan cheese, oregano and parsley flakes. Stir the mixture and sprinkle it over the top of the cauliflower. (You may not use all the mixture just enough to coat the top)
Cover with foil and bake for 20 minutes.
Remove the foil and bake for another 15 minutes, or until it's golden and bubbly on top.  (I turned the broiler on for 5 minutes) 


Enjoy ~


Mexican Rice Casserole ~


There aren't many casserole dishes I love.  This is the exception.  It's fabulous tasting and easy.  I found it on tastespotting and revamped it to make it even easier.
 
 
And I made it with chicken, so it's lighter while still having all the flavor. Here's what I did.  In a large casserole dish place two halves of chicken breasts with the onion, spices and tomato sauce in the oven covered with foil and bake for an hour and a half at 325 degrees.   Remove dish from the oven and let it cool a bit. Dice chicken and mix back in with the sauce.  Layer it on the bottom of an 11 x 11 casserole dish.  Top chicken with a sprinkle of cheese (out of the 2 cups you have set aside).  Next, mix together cooked rice, beans and cilantro. Add that on top of the chicken and top with a sprinkle of cheese.  Add sliced tomatoes and top with the rest of the cheese.  Place in the oven at 350 for 25 minutes, remove foil.  Let cook for 5 minutes longer.  Remove from oven and let sit for 5 minutes longer, sprinkle with cilantro.  Serve with toppings of guacomole, salsa, chopped cilantro and sour cream.  Simply delicious.  The tastespotting recipe follows below.


Mexican Rice Casserole


1 1/2 cups of white rice, prepared per instructions
1 tsp of olive oil
1 lb lean ground beef (I used 96/4)
1/2 sweet yellow onion, diced
3 cloves of garlic, minced
1 tsp paprika
1 tsp chili powder
1 tsp dried cumin
1 tsp garlic powder
1 tsp dried oregano
1/2-1 tsp crushed red pepper flakes
Sea salt and fresh cracked pepper, to taste
1 15 oz can of black beans, drained and rinsed
1 15 oz can of tomato sauce
3-4 tbsp fresh cilantro, chopped (divided)
1-2 cups of shredded cheddar cheese
3-4 tomatoes, sliced thickly
Sour cream (topping)
Salsa (topping)
Guacamole (topping)

Preheat the oven to 350 degrees. Prepare rice per instructions. While the rice is cooking heat the olive oil in a large skillet over medium heat. Once the skillet is hot, add the ground beef, making sure to break it up into crumbles. Cook the beef for 3-4 minutes then add the diced onion and all of the seasonings. Stir until well combined and cook for an additional 10 minutes or until the beef is cooked through and the onion is tender. Add the minced garlic and cook, stirring constantly for an additional 60 seconds. Add the cooked rice, drained and rinsed black beans, tomato sauce and a bit of cilantro (reserving some for garnishing) to the beef and onion mixture. Mix the ingredients thoroughly, taste and re-season if needed.

Coat a large baking dish with cooking spray and pour the rice mixture into the dish, spreading it evenly. Place the tomato slices on top of the rice mixture then top with cheddar cheese.
Spray a piece of tin foil with cooking spray (so the cheese won't stick) and cover the baking dish. Bake for 20 minutes then remove the tin foil. Bake for an additional 5-7 minutes or until the cheese is melted and golden brown. Remove from the oven and let sit for 5 minutes before slicing. Top with a dollop of sour cream and the remaining chopped cilantro. Enjoy.

Saturday

Pad Thai from my Thai Cooking class... excellent ~


I took a Thai cooking class in Boston over a year ago, and have been wanting to make this dish ever since, it's delicious.

However, I have been unable to find perserved turnip anywhere.  Even though I have one of the largest Asian stores and Chinatown is ten minutes away, still no luck.  Of course, my not being able to read Chinese, put a damper on most of the products I looked at.  I do think  though after my long search that Thai products aren't as available in Boston as Asian products.
 
So I decided to just skip it and am happy to report back, that it's still a wonderful dish without it.  I made it for a few friends and they loved it.

And easy too.  To me, that's the important part.  This dish comes together in about five minutes, so have everything ready ahead of time.  I also made a simple stir fry of pea pods to serve with it and it was a nice addition.

Ingredients:

Pad Thai Sauce:

2 cups of sugar
1 cups of fish sauce
1 cup of vinegar

Mix all ingredients in a sauce pan, bring to a boil and lower to simmer for 10 minutes.  Set aside.

Rice Noodles:

Soak rice noodles in a big bowl of warm water on counter for about 1 hour ahead of time.  Don't worry if the noodles don't appear soft enough to add, they soften up when you are cooking the Pad Thai.


Each serving below, is really enough for small plates.

1 T. vegetable or canola oil
1/4 cup pad thai sauce
1 egg, whisked
Cooked medium to large shrimp (6-8 large)*
chopped green onion (green parts only)
Handful of bean sprouts
Handful of roasted peanuts, crushed a bit in a food processor

In a large non stick skillet or wok, add and heat oil.  Add egg and stir gently.  Add shrimp, stir together.  Add a handful of drained noodles, stir until combined well.  Add bean sprouts, scallion and peanut.  Add pad thai sauce and stir well.

Divide onto two plates, sprinkle with scallion, more peanuts and a wedge of lime.

*If you are not a shrimp lover, then you can do a cubed breast of chicken.  Our instructor put a pot of simmering (not rapid boil), of water and put the chicken in the water for about 30 seconds to cook, then drained them to put in the the Pad Thai.

Enjoy ~
 

Friday

Tender White Cabbage with Salt Pork ~


White cabbage is a more tender version of green cabbage.  If you have an Asian grocer near you, you can easily find it there.  If not, you can certainly use green cabbage here.  Just cook it longer.  If you can't find salt pork, you can use bacon as well.

This is a delicious side dish on a cold winter's night.

1 small head of white cabbage, cored and sliced thinly.
3 slices of salt pork, diced.
salt
freshly ground black pepper

In a large saute pan, on stove top, turn burner on medium high heat.  Add oil and salt pork.  Saute about 5-7 minutes until pork renders, stirring.  Remove salt pork and add sliced cabbage.  Toss the cabbage until it's coated and shiny.  Add 1 teaspoon of salt and pepper and cook on medium low for about 10 minutes, or until cabbbage starts to wilt.  Cover and turn heat off.  Let sit on stove top for about 10 minutes.  Transfer to a serving dish and sprinkle with the salt pork.

Thursday

Traditional Miso Soup ~

My friend's mother grew up in Japan and this is how she serves Miso soup.  Traditionally, the rice is served on the side as in my picture.  My friend adds soup to her rice, that is the way she likes to eat it.

It's a simple, yet beautiful soup.  Very light and delicious too.  Any way you want to try it, you'll enjoy it. 

Miso soup:

4 cups of water
1 cup of chopped cabbage
1 inch rectangle soft tofu (not silken)
1 T. Miso paste
1 tsp. dashi powder
1 scallion, chopped
cooked rice

Bring water to boil, add miso paste and cabbage.  Let simmer for about 10 minutes, until cabbage is tender.  Add dashi powder, stir and turn heat to low.  Add tofu and let simmer for 4 minutes on low.  Serve with rice and scallion.

Oh, the way I eat it is to just add the rice to the soup after it's cooked.  Anyway you serve it, it's delicious. 

Enjoy ~


Saturday

Boston's Chinatown ~


I live about 7 miles north of Boston, but hardly ever go in town. Most of us avoid it because of the traffic, crowds and construction.
But, there are times and places that just cannot be missed. And Chinatown to me is one of those wonderful, little places tucked away in the heart of the City. A city, almost of it's own. I love the entrance to this part of town.

I had a mission this early morning too. I wanted to get to a bakery that makes Bahn Mi sandwiches. If you haven't heard of them, google them. They are Vietnamese sandwiches, made with meat, pickled vegetables and a lovely pate like dressing on a crispy baguette that is heavenly. And while waiting in the bakery I picked up some other delicious treats too.

Here we are heading over the Zakim Bridge, which leads directly into Boston. It was early in the morning and on a Saturday, so NO traffic whatsoever!


Oh, did I mention parking?  Well, usually it's a problem.  High
costs and lots of driving around to find a lot or garage.  We were hoping to park on the street and we had plenty to choose from.  Our mission for this visit, was to get a Bahn Mi sandwich.


We parked on Beach Street, right near this little bakery , Mei Sum that makes wonderful sweet and savory treats.  And being adventurous, I tried a few things I had no idea about.  My report is, all of the things I tried tasted excellent.  But, there is a language barrier, but don't let that stop you. The cost is fairly inexpensive and the pastries and food are wonderful.  I wasn't disappointed in anything.

While we were waiting for our sandwiches to be made, here are a couple of things that I saw.  These are fresh Bean Buns, ready for the oven.


Sticky rice, wrapped in Banana leaves.  I believe in the center there was taro, but I can't be sure.  The lovely ladies at the counter do speak English, but not fluently.  I believe this is a Holiday specialty though.


These next pictures are of the bakery case, lovely and inexpensive pastries.  I plan on trying different ones each time I visit.  We got the Coconut Snowballs today.  I wish I had enough in my budget and waistline to try one of everything.  ;)


And now for the big moment, our sandwiches.
 
Here is the Vegetable Bahn Mi:
 
 
And the Beef Bahn Mi, and this was heavenly.  Sweet, savory and just melted in my mouth.  Love the pickled veggies with cilantro and jalapeno.... super yum!
 
 
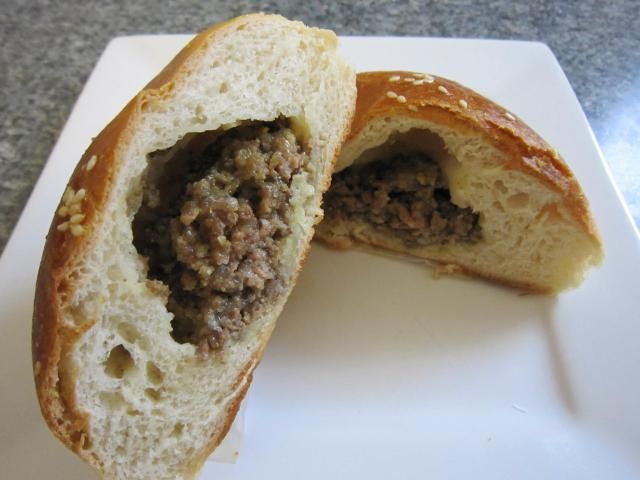
 While we were waiting for our sandwiches, a man was standing and eating a delicious looking bun.   He had a label on his jacket that said something in English, so I asked what it was.  He said it was a Beef Bun and that it was good.  So, I ordered one of those to take home for the next day's lunch.  At .90 cents, how could I go wrong?
 
Here's what I cut into the next day for my lunch.  It was fabulous, a sweet bun and tangy barbequed beef.


I loved my little visit into Chinatown and my friends and I discussed coming in for the day soon.  I agree, but think it's best to wait until Spring.  Can't wait....