Wednesday

Chicken with Fennel and Olives, over Creamy Parmesan Polenta


I can't say enough about this fabulous dish.  It is now my favorite chicken recipe and that says a lot...

I have been trying to make a creamy polenta, and this one with parmesan cheese is over the top.
I got this recipe from a great blog, Proud Italian Cook, whose pictures and recipes are amazing.

Here's the recipe, which I tweaked a bit and it was amazing.

6 chicken thighs
1 fennel bulb, sliced
1 onion, sliced
8 cloves of chopped garlic
1 14 oz can diced tomatoes (I used 5 roma tomatoes, chopped and sprinkled with salt, left to sit out for an hour)
Jumbo green pitted olives (I bought about 10 and sliced them in half)
Parsley, thyme, oregano and basil (I used 1 tsp. of parsley, thyme and basil from penzeys)
White wine (about 1/4 cups)

In a large oven proof skillet brown up your chicken which has been seasoned with salt and pepper until it has a nice deep golden color, remove and drain the fat. Drizzle in some olive oil and saute the garlic, onion and fennel and then deglaze with a healthy splash of white wine. Add in your herbs, salt and pepper then place the chicken back in. Spread your olives all around then place the pan in a preheated 375F oven for around 45 minutes uncovered.*

*I put in a talbespoon of olive oil to brown the chicken and cooked it about 4 minutes on each side on medium heat on top of the stove.


It doesn't say when to add the tomatoes, so I put them in after the wine.


Creamy Polenta
1 1/2 cups of half and half, cream or milk
1 1/2 cups of chicken broth
3/4 cup of polenta,
1 tablespoon butter
Grated parmesan ( a nice size handful) and chopped basil
In a deep sauce pan heat your milk and broth until boiling then whisk in the polenta until it starts to bubble and splatter, be careful! Take it off the stove add in butter, cheese, snipped basil, salt and pepper to taste. Tastes best when served immediately, if it thickens up just add more liquid to loosen it up.

* I added 1 Tablespoon of cream cheese right near the end of the cooking.


Tuesday

Coconut Banana Bread with Lime Glaze


I started looking for something to make with bananas, because I had four very ripe, but not black bananas sitting on my counter.  They were too ripe to eat, so I thought that I'd bake something.  But, I am not a huge fan of banana bread.  And then I received this email from Cooking Light and it had a quick bread sub-title with five different banana breads to make. I flipped through the recipes and this one stuck out.  Banana bread with coconut? yum. Banana bread with coconut and a lime glaze.  Double yum.  Cooking light claims that it is in the top ten quick breads since 2007.  I think that's impressive.

And it's a very easy recipe. Here is it.

Coconut Banana Bread with Lime Glaze


Best Quick Bread. This recipe originally appeared on the cover of our September 2003 issue and remains one of our best banana breads. --Recipe by Jean Patterson (September 2003)


Yield: 1 loaf, 16 servings (serving size: 1 slice)


2 cups all-purpose flour (about 9 ounces)
3/4 teaspoon baking soda
1/2 teaspoon salt
1 cup granulated sugar
1/4 cup butter, softened
2 large eggs
1 1/2 cups mashed ripe banana (about 3 bananas)
1/4 cup plain low-fat yogurt
3 tablespoons dark rum
1/2 teaspoon vanilla extract
1/2 cup flaked sweetened coconut
Cooking spray
1 tablespoon flaked sweetened coconut
1/2 cup powdered sugar
1 1/2 tablespoons fresh lime or lemon juice

Preheat oven to 350°.

Lightly spoon flour into dry measuring cups; level with a knife. Combine flour, baking soda, and salt, stirring with a whisk.

Place granulated sugar and butter in a large bowl; beat with a mixer at medium speed until well blended. Add eggs, 1 at a time, beating well after each addition. Add banana, yogurt, rum, and vanilla; beat until blended. Add flour mixture; beat at low speed just until moist. Stir in 1/2 cup coconut. Spoon batter into a 9 x 5-inch loaf pan coated with cooking spray; sprinkle with 1 tablespoon coconut. Bake at 350° for 1 hour or until a wooden pick inserted in center comes out clean. Cool in pan 10 minutes on a wire rack; remove from pan. Combine powdered sugar and juice, stirring with a whisk; drizzle over warm bread. Cool completely on wire rack.


CALORIES 193 (21% from fat); FAT 4.6g (sat 2.8g,mono 1.1g,poly 0.3g); IRON 1mg; CHOLESTEROL 35mg; CALCIUM 15mg; CARBOHYDRATE 35g; SODIUM 179mg; PROTEIN 2.9g; FIBER 1.1g

Cooking Light, SEPTEMBER 2007


Here it is sliced and plated.  I sprinkled extra lime zest, but the coconut is from inside the bread.


I hope you will give this recipe a try, it's delicious.  Thanks for stopping by ~


Friday

Sunday Gravy ~ My Spaghetti Sauce


I have always loved spaghetti sauce, but grew up in an Irish home where we only had the American version.  I still liked it, but nothing (to me), compares to good sauce/gravy.  It's the ultimate comfort food for me.  It is easy to freeze and it's so easy to make, I can nearly do it blindfolded by now.  And believe me, there are wonderful recipes out there for really great sauce. Hazan's, Giada's, Lydia.  Who needs more?

But this one is all mine and I am going to do a pictorial so that even a very beginner can learn.  Yes, it's that easy.

So, if anyone asks me what makes a winning gravy?  My answer is the meat.  Yes, that's right, the meat.  It gives a wonderful depth of flavor to the Sunday Sauce.  And I am not talking about meatballs.  I am talking about the meat you simmer the tomatoes in.  So lets get started.

The Tomatoes are pretty important too, but most canned tomatoes are really good now, so I think your are safe with most top brands.  Just get crushed.  I use Pastene Kitchen Ready.  Two cans of it and one small can of tomato paste in my gravy. Just take the lids off and you will be ready to start. By the way, I interchange the word Sauce/Gravy all the time.  Just so you know....

Open two cans of Crushed Tomatoes, I use Pastene Kitchen Ready.


Now, chop 3 cloves of garlic, open 1 small can of tomato paste and pour 1/2 cup of red wine.  I only had white wine, but we'll pretend it's red...


Next, the star of the show, the meat.  I buy and freeze cheaper cuts of beef and pork for my gravy.  I really like to use pigs feet, but today I didn't have any.  So I used a piece of pork from the rib section, which was on sale.  And a couple of hot Italian sausage.  In a Dutch Oven, heat 3 Tablespoons of olive oil on medium heat.  Put your meat to brown about 3 minutes per side.  After they are browned, remove your pan from the heat.  Add your garlic and cook it for 2 minutes, while it's off the heat.  Burnt garlic ruins the gravy.  So when your are adding the garlic, have your pot off of the heat.  The garlic will still cook, from the heat of your pan.


Now go ahead and turn your heat on medium low and put your pan on the burner once again.  It's safe, if you didn't burn the garlic.  Another step that I was taught and I do think it makes a difference is to "fry the paste".  Which mean you are going to cook the paste when you add it for at least a minute. You will just have to trust me on this one, it comes from someone who knows, right from Italy almost 100 years ago.


Now, you are going to add the wine and remember to add the red wine, not the white wine like I did. Be sure to stir the sauce frequently at this stage.  Add 1 tablespoon of Kosher salt and 1 teaspoon of freshly ground black pepper.  Stir again. 


Next you are going to add your two cans of Pastene, or whatever kind of crushed tomatoes you are using.  They are the large cans, not the medium and not the small.  After you empty the cans into the pot, you are going to fill each can about 1/4 the way up with cold water.  Take a wooden spoon and swish the water in each can and empty the cans into the sauce, (This way, you will get all of the sauce from the cans with no waste).  Bring it to a simmer, stiring every minute or so.  You don't want to burn the bottom of your sauce, which I have done by walking away too soon from the stove.  You can walk away from the stove, just not now.  And toss in a couple of bay leaves and stir again.


Now, you are almost ready to let this sauce sit on the stove and cook itself, but not quite yet.  You need to add a couple of more things.  Add a pinch or two of red pepper flakes.  I am not promoting any company, I just couldn't turn my hand quick enough. I am not too good at taking a picture with one hand and placing my products with the other hand at the same time.  I do buy other spice brands as well, just to make it fair.  Spices are expensive, so be sure to check out your local ethnic stores to get spices more reasonably priced.


After you bring this to a simmer, TURN down the heat to low.  Using a good pan also helps the sauce not to stick to the bottom of the pan, while you walk away from the stove for 2 or 3 hours to allow this to cook. Now, place the lid on top of the pan just like this. And then you can walk away and let it simmer.  Make sure you come back and stir it every 1/2 hr. just to be sure that nothing is sticking.


Okay, here is the finished sauce, I mean gravy... ugh, I don't know what I mean.  Can you see the shine?  Can you see that it's done?  It just has the tiniest amount of shimmer on the top. Can you see the tiny bubbles, yes it's done.  Now you can taste and adjust the sauce.  I usually add a tad more salt and pepper.  At this point, you cook your pasta and serve. And don't forget to add a handful of grated parmesan cheese on the top of each pasta place.   Whatever amount you have leftover, freezes really well.  I use heavy duty freezer bags, laid down flat to freeze mine. 


I hope you enjoy making your own sauce now.  You can tweak it to make it your own.  Go ahead, it's fine.  Everyone likes thier own little favorites.  More red pepper flakes?  Anchovies?  After a few times of making sauce, it becomes your own anyway.  Mangia ~

Thursday


Three Cheese Lasagna ~

I learned to make lasagna as a teenager, so it's not difficult at all.  The ingredients you put into the lasagna are what make it so good.  Good cheese, good tomato sauce. That's it.  Then it's an assembly that comes together easy.  Even if you mix up a step, or reverse the layering, no one will know.  It's a casserole of sorts, meant to be tossed together and covered with your sauce and cheese.

First of all, I make my own sauce/gravy.  But, you don't have to.  I just find that I can control the sodium levels in my own sauce, where I can't in store bought ones.  If you use a good store bought tomato sauce to save time, then go for it.  Your lasagna will come out fine.

Ingredients:

Tomato sauce, about 2 cups.
1- 6 oz. ball of good mozzarella cheese (I use Vermont Cheese)
2lbs of Whole Milk Ricotta Cheese
3 large eggs
1 box of curly lasagna sheets (I use Barilla)
3/4 cups of grated parmesan cheese  (I use Parmigiano Reggiano)

Preheat oven to 350 degrees Fahrenheit.

Place rack in the middle of the oven.

Fill a very large (6 or 7 qt. soup/sauce pan) pot, with the hottest tap water you can get out of your faucet.
Fan out your lasagna noodles and immerse in the water.  Let them sit for 15 minutes.

In the meantime, mix the ricotta cheese with the eggs one at a time.  Add 1 tablespoon of kosher
salt and 1 tsp. of freshly ground black pepper.  Whisk well, for a couple of minutes.  Set bowl aside.
Slice your mozzarella very thinly and set aside.

Now, you are ready to assemble.  Take a ladle (I use a large soup size).  And add 1 ladle full of sauce into the bottom of a 9 x 13 inch pyrex dish.  If you don't have this dish, use a baking dish similar in size.  Not larger than this size.  Smaller is okay.  Strain your lasagna noodles into a large colander.  Let air dry for a few minutes.
Now, add three lasagna noodles the long way in your pyrex dish.  They should be touching one another.  If your dish is longer, then turn your noodles the opposite way and cut to fit.  Trust me, cutting up your noodles to fit doesn't matter, except to make it look pretty on the top layer.  You want to save 4 unbroken ones for that layer.
Add 1/3 of your ricotta cheese, and about 1/3 of your mozzarella slices.  When you add your sauce on the second layer, add half of your parmesan cheese.  Repeat once more, ending with the parmesan sprinkled all over the top.

Bake in the oven for 40 minutes covered with foil.  Uncover and continue to bake 10-15 minutes longer.  You want to see it bubbling a little, and then you will know it's done.

This is an important part:  Let your lasagna rest uncovered for 15 minutes before you serve it.

Serve with a nice, green salad.

Enjoy ~

Sunday

Chicken Thighs Roasted with Garlic, Chiles and Soy...


Okay, so another chicken dish.  Well, I told you that I eat a lot of chicken.  I make most of my meals on the weekend to heat up during the week.  I work at an office and some days are crazier than others and on those nights, it's heavenly to come home and just throw something it the microwave for a minute.  And I take salads for lunch most days, and a piece of chicken is a nice add on for my salad.  Once summer is in full swing, I don't cook on the weekends, just eat fresh produce most nights.  We are kind of deprived during the winter, so I indulge all I can during the summer months. :)

This dish came from a board I belong to, and we were discussing a favorite way to cook thighs.

So this is from there and the sig on the person is naturalheightsfoodie.  Kind of cute, huh?  Anyway, what
differs in this recipe from most lately, is you add the marinade to the dish to cook.  So you decide.  Do you want to save out half the marinade and use only the fresh one to cook, or just do what I did and put everything in the baking dish.  I marinated the chicken for about 6 hours in my fridge before roasting it.  It's quite good and has a kick from the jalapeno pepper.

Chicken Thighs Roasted With Ginger, Chiles and Soy

4 servings

2 tablespoons minced fresh ginger
1/2 serrano chile, minced (I used half a jalapeno, with the ribs and seeds)
2 cloves garlic, peeled and minced (I used 3 cloves of garlic)
1/4 cup soy sauce
1 tablespoon vinegar
1 tablespoon brown sugar
1 teaspoon oil
8 skin-on, bone-in chicken thighs

Combine all ingredients in a gallon freezer bag or glass bowl. Marinate in the refrigerator for several hours or overnight.
Preheat oven to 350 degrees. Arrange chicken, skin-up, in a baking dish just large enough to hold the pieces in one layer. Pour all remaining marinade over the chicken and bake for 1 hour and 15 minutes, or until skin is crisp and chicken is well cooked. Serve with the baking juices.

Saturday

Tomato, Cilantro and Gruyere Cheese Omelette..


I know, I know, who can't make an omelette?  But, for beginners it can be a bit daunting.
How many eggs?  How hot should the pan be?  Or even, how long does it cook for?

Well I decided to do a step by step pictorial, so that even my grandkids can make an omelette.

First you need three eggs, broken in a bowl and whisked with a tablespoon of water and a pinch of salt and pepper.  And whisk until there are bubbles.

Next, you want to gather your ingredients you are putting inside or on top of your omelette.  For this one omelette, I used 1 smallish ripe tomato, seeded and diced with a pinch of salt and let sit on a paper towel for about 10 minutes.


Next, chop or grate 1/3 of a cup of gruyere cheese.


Next, chop a handful or heaping tablespoon of fresh cilantro. Oops, I forgot to take a picture of the chopped cilantro, but I bet you know how to do that... ; )

Now, you are ready to make the omelette.  Place your skillet on a medium setting (I use #6 to start) and toss in 1 tablespoon of butter.  Turn down the heat to a #4, so your butter will melt, but not burn.


When the butter is melted, remove skillet from the heat and pour your eggs into pan.  Put the skillet back on the heat and let it sit for 1 minute.

The next part goes kind of quickly, but don't get nervous, just have all of your ingredients close by.
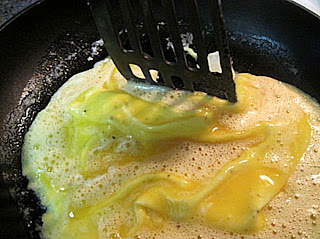
With your spatula, move the outer edges toward the middle of the pan and tip your skillet to allow the egg mixture run to the outside.  Sounds confusing, but it's not hard, really.

Do this step a few times until there is hardly any liquid egg to move. Just keep tipping your pan and pulling the outer edges toward the middle of the pan. 

Now it's ready to add your ingredients.  Slide the skillet off the the burner while you add your ingredients.

Now add your ingredients.  This you will want to do rather quickly and don't fuss with them, really.  No need to.
Now you will just take your spatula and fold over one side on top of the other side of the omelette to cover the vegetable and cheese.  I couldn't take a picture of my omelette being flipped, so here it is just afterward.  It's easy, trust me.  And, if it's not perfect, don't worry you can toss some extra tomatoes and cilantro on top.  No one will ever notice ~

Now turn off the heat and let the omelette sit in the skillet for 2-3 minutes to set. At this point, transfer your omelette to a plate and sprinkle a few of those tomatoes and chopped cilantro to make it look nice and pretty on the plate!

Voila ~ enjoy..

Thursday

Happy St. Patrick's Day....


I wanted to make something from my Irish heritage today, but I am not a fan of Corned Beef.
I'm not a big fan of lot's of kinds of meat, just so you know that I hold nothing against beef being corned. :)

I'm a bacon lover though, so I thought this might do.  Like I said, I don't always use a recipe, and this is one of those times.  I just put a bit of this and that and call it a day.  But, I did keep track of what I used, so this one can be copied, if anyone really wants it.

1 lg. head of green cabbage, cored and thinly sliced
3 slices of bacon
2. cloves of garlic, minced
1/2 cup of wine
1 T. kosher salt
1 teaspoon of black pepper

Put bacon into cold skillet.  Cook on medium low, or however your stove lets you cook it without burning.  You want it brown, but not crispy brown.  Or at least I do.   Let it cook slowly for about 5 minutes, turning it to brown a few times.  When browned, remove bacon and place on a paper towel to drain.  Place cabbage in skillet and sprinkle with salt.  Turn it with tongs and let saute for almost 10 minutes or so.  It will start to brown in places during the last minute.  Add garlic and toss, add black pepper and toss again.  Cook for another minute, while tossing it a few more times to cook the garlic.  Shut off heat.  Add the wine.  Stir again.  Cover and let it sit for about 10 minutes and in the mean time, chop the bacon into bite size pieces.
Lift cover, sprinkle the bacon and toss.  Adjust your seasonings.  Sometimes the cabbage needs a little more
salt and pepper.  Serve hot or warm.


Sunday

Oh for joy.... Almond Joy Bars..


I have a friend, who owns a little cafe and catering business in Rochester, N.H.  Another friend and I stopped in for lunch one day, if you are ever up in that area, do have lunch.  It's a fabulous hidden gem.
It's in a little town in N.H., called The Portable Pantry and here is the link.  But don't leave without buying one these bars, they are outstanding.

http://www.portablepantrynh.com/

Saturday

Yakisoba Stir Fry - A nice and easy week night delight ~


This little package is my new friend...  

The package consists of the noodles and a flavor packet.   You can find it in the refrigerator section of your grocery store and have a delicious dinner done in about 15 minutes!  I literally chopped  up some cabbage, mushroom, carrots and threw them in for a quick saute.  I added about 1/2 cup of cooked and cubed pork tenderloin that I had leftover in the freezer, and added the contents of the package.  And to finish it off, I just chopped up green onion to the finished dish.
It is really good too.  Oh, just to make it clear, I have no affiliation to this product, nor am I pushing you to
buy it, but if you are interested, it's a great little helper to an quick and easy dinner.  Serves two.
Here's the finished dish.  And it's as yummy as it looks.... lol!


Wednesday

Mahi Mahi with Tomatoes and Capers


This dish was adapted from Ina Garten, who is one of my very favorite cooks.  Her recipes are lucious and everything she makes uses excellent ingredients.  And this dish is no exception.  I love the ease of this dish.

I used flash frozen Mahi Mahi, from Costco and it was still outstanding.  Ina makes it with Swordfish, and I although I am sure it's outstanding.  I am not a fan of swordfish.  But Mahi Mahi is a nice substitute, it's a fairly firm fish that stands up to grilling as well.

Here is Ina's recipe, my changes are marked with asterisks.

Swordfish with Tomatos and Capers
1 cup chopped yellow onion -- (*1 onion)
1 cup chopped fennel -- (*1 bulb)
3 tablespoons olive oil
1 teaspoon minced garlic
28 ounce can plum tomatoes -- drained
1 teaspoon kosher salt
3/4 teaspoon freshly ground black pepper
2 tablespoons chicken stock
2 tablespoons good dry white wine
1/2 cup chopped fresh basil leaves
2 tablespoons capers -- drained
1 tablespoon unsalted butter
4 1-inch-thick swordfish fillets -- (about 2 1/2 pounds) *Mahi Mahi
fresh basil leaves

I have updated a Barefoot Contessa classic by adding fennel to give it more flavor. You can add any Provencal ingredients that you like: pitted nicoise olives, sauteed bell peppers, anchoives, even a garnish of steamed mussels.
This sauce is also delicious with other grilled fish, such as cod or red snapper.

For the sauce, cook the onions and fennel in the oil in a large saute pan on medium-low heat for 10 minutes, until the vegetables are soft. Add the garlic and cook for 30 seconds. Add the drained tomatoes, smashing them in the pan with a fork, plus the salt and pepper. Simmer on low heat for 15 minutes. Add the chicken stock and white wine and simmer for an additional 10 minutes to reduce the liquid. Add the basil, capers, and butter and cook for 1 minute more.

Prepare a grill with hot coals. Brush the swordfish with olive oil, and sprinkle with salt and pepper. Grill on high heat for 5 minutes on each side until the center is no longer raw. Do not overcook. Place the sauce on a plate, arrange the swordfish on top, and garnish with basil leaves. Serve hot or at room temperature.


Saturday

Chicken Tikka Masala


Chicken Tikka Masala - Adapted from Aartie Party

Those of you who know me, know I make a lot of chicken dishes.  I used boneless, skinless chicken breasts in this dish rather than chicken thighs, which is what the recipe calls for.  Don't get me wrong, I love the thigh meat also, but I didn't have any.  I did have plenty of boneless skinless chicken, so that is what I used. Some recipes don't taste as good if you use a different cut of meat, but this isn't one of them.  This recipe is mostly about the sauce, trust me.    I saw Aartie's Party on the Food Network and have been wanting to try Chicken Masala for awhile now and when I watched her make this recipe and it looked really good.  So, I put it on my short list.  I am also very lucky and live in an area that is a melting pot of sorts, with many ethnic grocers.  I love ethnic grocery stores, usually you can find great spices and condiments at half the price of regular grocery stores.   

This recipe seems rather long, but don't be put off by the length of it.  If you need to, watch the show on Video Deman or over on the Food Network, she gives you some tips that aren't in the written recipe.

Here's the receipe and my changes will be noted with an asterisk.

I served my dish with a simple side of basmati rice with cilantro and roasted asparagus.  Enjoy!

And thanks for stopping by ~

Chicken Tikka Masala

Recipe adapted from Aarti Sequeira

.Prep Time:20 minInactive Prep Time:30 min - Cook time 30 min,
Serves:
4 to 6 servings.Ingredients
Marinade:
•1 cup plain yogurt, whisked until smooth
•3 tablespoons Ginger-Garlic Paste, recipe follows (or 1 tablespoon grated fresh ginger and 3 cloves garlic put through a garlic press or finely minced)
•1 teaspoon kosher salt
•1/2 teaspoon freshly ground black pepper

•1 pound boneless, skinless chicken thighs, poked with a fork, and cut into large bite-sized chunks * I used three breast halves, cut into thirds

Sauce:
•2 teaspoons olive oil
•3 tablespoons butter
•1/3 cup Ginger-Garlic Paste, recipe follows (or 6 cloves garlic and 2-inch thumb ginger minced)
•2 serrano peppers, minced (seeds removed if you don't want it spicy)
•2 tablespoons tomato paste
•1 teaspoon garam masala
•2 teaspoons paprika
•8 Roma tomatoes, diced *I used a 28 oz. can of diced tomatoes with juices
•1 1/2 teaspoons kosher salt
•1 to 2 cups water  * I used 1 cup
•Oil, for grilling
•1 tablespoon dried fenugreek leaves (optional) *Aarti said if you don't have this available to use a little Maple Syrup... interesting!
•1/2 cup heavy cream
•Minced fresh cilantro, for garnish
•Cooked rice, naan, or crusty piece of bread, for serving
Directions
For the marinade: In a large bowl, mix together the marinade ingredients. Add the chicken and toss to coat. Marinate at least 30 minutes, or in the refrigerator up to overnight.


For the sauce: When you're ready to make the curry, place a large skillet over medium heat and add the olive oil and butter. When the butter has melted, add the Ginger-Garlic Paste and serrano peppers. Saute until lightly browned around the edges. Add the tomato paste and cook until the tomato has darkened in color, about 3 minutes. Add the garam masala and the paprika and saute for about 1 minute to draw out their flavors.


Add the tomatoes, salt, and 1 cup water. Bring to a boil, turn down to a simmer, and cook until thickened, about 20 minutes. You may need more water depending on how much liquid the tomatoes give off.


Meanwhile, fire up your grill. When it is nice and hot, lightly brush it with oil. Place the chicken on the grill, shaking off some of the excess marinade. Cook until it's charred, about 2 minutes on each side. (Don't worry that the chicken will still be a little uncooked, it finishes cooking in the sauce).  *I used my indoor grill pan and I would not do it this way again.  I will broil it, because I don't have access to an outdoor grill.


Pour the sauce into a blender or food processor, or use an immersion blender, and process until smooth. Pour back into the skillet and bring back up to a boil. Add the chicken and fenugreek leaves, if using. Take the heat down to a simmer and cook for about 10 minutes. Add the cream and stir through. Garnish with minced fresh cilantro, and serve over rice, with naan, or a crusty piece of bread!

Ginger-Garlic Paste:
•1/2 cup cloves garlic, whole
•1/2 cup fresh ginger, peeled, cut into 1/2-inch slices
•1/4 cup canola oil
Throw the garlic, ginger, and canola oil in a mini-food processor and let it go until it forms a semi-smooth paste. There will still be tiny little pieces in there, but overall, it should resemble a paste.


Save what you don't use in a small glass jar. It should last in the fridge for 2 to 3 weeks. It's a delicious addition to marinades, pasta sauces, stir fry sauces, slow-cooker recipes, gravy etc. We always had a jar of this stuff in our fridge growing up.